Glass Process
I purchased a glass kiln that has elements in the lid and sides.
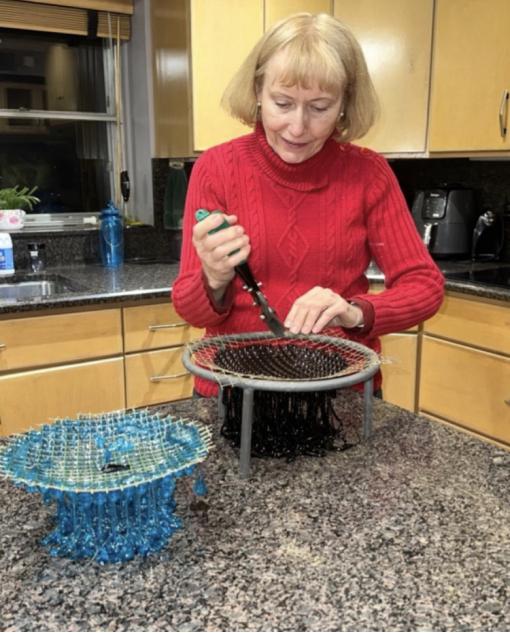
I hire a metalsmith to weld a round metal circle using 304 stainless steel half inch diameter rod with three legs leveled and welded. The three legs are 5 inches tall. I have a large number of these frames in many sizes and heights. It’s best that the frame is 4 inches shorter than the depth of the kiln. I need room to stack the glass on the mesh and need a kiln shelf below the glass and 1 inch above the kiln floor
I decide what project I’ll make by looking over all the glass, decide on a “Drip” “Drape” or “Mushroom”. If it’s multiple layers to make it large and tall, I’ll take the bottom flat piece of glass, then break up the other pieces and put on top. I think that stops bubbles from forming during firing. I determine what COE (Coefficient of expansion) the glass is, colors, and how many layers I want for the height I want it to drop.
I use half inch spaced galvanized, metal mesh and 20 gauge wire to wrap the mesh tightly to the frame to hold the weight of the glass.
I use kiln wash or thin fire paper on the kiln shelf. I need to allow several hours to dry the three coats of the kiln wash before I fire.
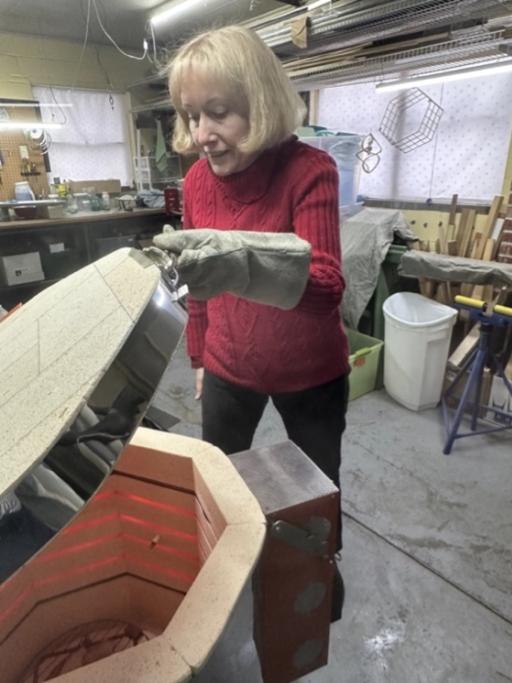
I place the glass on the metal mesh and gently lower it into the kiln. I am careful there is no glass that might fall against the metal frame or legs. The glass and thick metal cool at different rates and will crack your finished piece. The metal mesh is thin enough to not affect the COE of the glass.
I heat the kiln slowly; between 300 and 400° (about 5 hours) to 1300 to 1550 depending on what kind of glass I’m melting. At 1300, I quickly peek into the kiln to determine the progress. As the glass clears the mesh, I’ll look often.
This involves putting on elbow length leather heat resistant gloves even to open the kiln lid. This will drop the temperature 25-40 degrees with even a quick look. My second kiln has a custom-built door in the bottom that allows me to view the glass melting from below. The kiln loses less heat this way but it takes me laying on the floor, with a flashlight to see any progress.
I can’t let the color of the glass fool me. It’s never the color it was before heating. The higher the temp goes, the more difficult it is to see the details, it becomes eye bulging bright and the heat waves distort my vision.
Of course, I need and even sometimes wear eye protection and a respirator to protect my eyes and lungs from the burning galvanized steel of the mesh. The liquid glass now slips through metal mesh and descends, sometimes staying in thick long ropes, others thinning out so as not even to be visible except when back lit, thinner than a single hair strand! The glass will accelerate with the added weight. If I wait too long between checks, it puddles on the floor of the kiln. If caught in time, I’ll end up with all the stages of gravity’s effects on the newly heated piece; legs to the floor, attached feet with nice details, (not pooled on the kiln floor) and some partial drips at the edges just peeking through the mesh. When it’s Goldilocks “just right”, the kiln lid is propped open and vented to 1200. I’ll shut the lid to anneal or cool to 960 where it will hold that for one hour, then continue to cool to room temperature.
I don’t peek in the kiln when it drops or the glass could devitrify, go cloudy, crack or shatter. This part of the process takes about 13 hours.
I carefully remove the metal frame with the glass hanging below it and place it on a rotating surface that will allow me to cut away the mesh and frame with aviator snips without having to touch the glass or move the piece.
I wash the kiln wash or thin fire paper off the bottom, and by inverting the entire piece I can get all the metal and glass chips out as well.
I take photos of the glass before I even wash it, another picture as it sits in the kiln on whatever stands or props before firing, immediately after firing and before removing it the last time in the photo studio with the proper lighting, the good camera, on a tripod, and every angle a customer would want.
I’ll take the measurements and weight of each piece. I’ll record this info and place it with the finished piece.
I will repeat the process, every day, twice a day, but never on Sunday. ☺